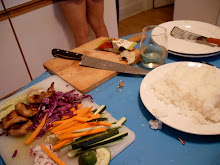
roasting a chicken is the fanciest thing you can do for a party or just because whole chickens are always on sale at whole foods. roasting a whole chicken is considered quite a feat but it's not really that hard. the key is spicing, buttering and stuffing it because otherwise it's just hot chicken.
ideally you would have a roasting pan but since i don't i use a sautee pan that is safe for the oven. the one nice thing that i own is a copper core stainless steel pan. i cringe when roommates take it out to make eggs but i do use it to roast my chickens in. you can use any pan that you have as long as you don't think that it'll melt in the heat.
i'm going to tell you how to make a classic roast chicken and you can change the herbs and seasonings to fit your mood or the season. i'll give you the basics.
1 whole chicken
1/2 stick butter cut a few pieces into thin slices
salt and pepper
rosemary
1 onion quartered
1 clove garlic
preheat the oven to 425 degrees.
place the whole chicken on a clean cutting board.
first stuff the inside of the bird with the onions and some sprigs of rosemary or whatever other herb you want. also stick your hand way inside and place a few pads of butter on the walls of the cavity of the bird.
oh yeah, did i mention i went to french culinary school? life is nothing without butter.
next take the rest of the butter in stick form to easily grease up this chicken. taking the stick of butter in your hand rub vigorously all over the bird, focusing on the breasts but not neglecting the thighs, legs and even wings - someone will eat them (probably me). make sure you use all the butter and don't forget to do both sides it'll looks super shiny and delicious (don't take a bite - salmonella! ) sprinkle (a healthy sprinkle) salt and grind some pepper all over on both sides. sprinkle the herbs of your choice all over the bird. everything will stick because of the butter.
place the bird, breast down, into the pan. you should cook it breast down so that it won't dry out. nothing is worst than dry chicken! cook for a while. don't check before 30 minutes. if you have one of those handy meat thermometers break those out to make sure it's cook all the way through. otherwise you could have a regular thermometer and make sure it can hold a temperature of at least 170 degrees when inserted into the thigh.
once it's done let it rest on a clean cutting board ** not the one you prepped it on ** for about 10 minutes. at this point you can serve the whole bird and slice it up at the table. you could also cut it up ahead of time and serve the pieces. what i usually do is grab my mozzarella stretching gloves (they're actually dish washing gloves but i only use them for food) they're made to withstand high temps. i use them to make sure i get every piece of meat off the bones so i don't leave any deliciousness behind.
you can also break down the chicken ahead of time and roast the pieces separately. you would follow all the same steps but you'll need to check on the chicken earlier than 30 minutes since it won't take as long to cook. and obviously you won't stuff the bird since it has nothing to stuff at this point!
you can also put all your veg and potatoes in with the chicken to cook your whole meal in one pan and viola, dinner!
enjoy your chicken darlings!
love,
keighty
Wednesday, September 15, 2010
Wednesday, March 17, 2010
butternut squash tart
i got this recipe from a whole foods app but i changed it so much that the only thing in common is the butternut squash. i just need ideas some times. without it i think i'd make pizza and soup every other day.
1 big butternut squash - yay! finish off your winter stock pile, it's spring!
1/4 cup slivered almonds
1/4 cup half and half
1/2 onion, minced
bread crumbs - process two big slices of bread
1 egg, beaten
philo dough, brought to room temperature
parmesan cheese - enough
dash of nutmeg
i made this in a tart pan that belongs to tricia. if you don't have a tart pan you can use a pie tin or even a cake pan.
preheat your oven to 400.
peel, de-pulp, and chop your squash into bite-size pieces. put on a sheet pan, drizzle with olive oil, salt and pepper and roast until tender.
unroll your dough and fit it into the pan. set aside
saute onion. place in a small bowl. add the rest of the ingredients. when the squash is done add it to the bowl and mix well. pour that mess into the tart pan. smooth it out. top with a little more almonds and some more cheese. bake until it's bubbling slightly.
i served this with plantains (sliced thin and fried in butter) and marinated vegetables - since it was monday and i needed to clean out the 'fridge before grocery shopping. a nice green salad would go well with this.
don't be sad if you tart pieces fall apart. my did. it was more like a pile of something than a piece of tart. but it tasted really great and that's all the matter.
yay vegetables! you can be a main dish!
love,
keighty
old new waffle iron
my dad is getting too fancy and him and his wife, debbie, have bought just about everything there is to buy in williams-sonoma. so.. they're turn of the century cast-iron waffle iron was of no use to them so they mailed it to me!
i used my regular "free range pancake" recipe and just slathered the thing with melted butter and it made glorious waffles.
it's not a recipe but it's cool to think about how many people ate waffles from this thing. it's over 100 years old!
awesome.
love,
keighty
i used my regular "free range pancake" recipe and just slathered the thing with melted butter and it made glorious waffles.
it's not a recipe but it's cool to think about how many people ate waffles from this thing. it's over 100 years old!
awesome.
love,
keighty
chili rellenos
if you know me you'll know that this was the most delicious meal ever.... no.
i don't like mexican food but i love my husband and friends and they do so here's another tribute to them.
this is my dad's favorite meal and i made it recently to practice for his upcoming birthday and trip to visit me.
it is supposed to be about 1-2 chilies per person but i had a lot more people come to dinner than i planned for so i made it a casserole and we shared it all.
that said...
as many poblano peppers and you need to feed your guests or yourself.
1 block of jack cheese
1 block of cheddar
4 egg whites, beaten to a soft peak (can be done with a whisk, you don't need that electric mixer!)
1/4 cup flour
veg oil - as much as needed
sauce:
1 onion, minced
1 garlic clove, minced
1 can of chopped tomatoes - if in california use fresh!
1 cup chicken stock
fresh or dried cilantro - if using fresh you'll need more than if using dried
salt and pepper
roast the peppers! turn the burner on and put the pepper on top of the flame. leave it there until it's black and charred. keep turning it to make sure it get charred all over. when it's done put them in a bowl and cover the bowl with saran wrap. this steams them and make it's easier to take off the charred skin. let them sit there for a few minutes.
in the mean time grate all the cheese! or have one of your guests do it, they're always asking if they can help - let them!
go back to your peppers and take off the plastic. they should be cooled down now, if not let them cool a little longer. GENTLY peel off the black skin over a trash can or sink. if you need to, use a little cool water to help you. don't get too crazy and rip the pepper in half. careful.
once all the peppers are cleaned carefully cut a hole in the top of the pepper, taking off the stem and leaving you a place to stuff the cheese! it the pepper rips it's ok, it'll work out in the end. put the flour in a small bowl next to the beaten egg whites. stuff the peppers - as full as you can - with all the cheeses. take one pepper at a time - coat the pepper in flour and then coat it completely in the egg whites. place them on a plate to be fried.
now the sauce. mix all the ingredients together and let it simmer.
get a pan heating on the stove. add the oil (about 2 inches) when the pan is hot and let it heat up for a little while. you can also fill a big pot with oil and fry them like that but this way saves some oil. place the pepper (if there's a rip but that side down first) in the pan. and let it fry up. flip and fry the other side.
serve them right away - one pepper per person, drizzled with the sauce and topped with extra grated cheese (if you have any left)
served it at family dinner with rice, bean and tortillas and everyone was happy.
ole.
love,
keighty
Sunday, January 17, 2010
sunday doughnuts
so i made doughnuts today and they were really simple.
i like to collect parlor tricks to show off my fancy cooking skills. i call them parlor tricks because they're actually really easy to make but everyone else will think that they're so hard and that you're so cool.
these doughnuts are a parlor trick.
1 tbs melted butter
1 egg
1/2 cup sugar
2 tsp baking powder
1/4 tsp salt
1/2 cup milk
1 tsp nutmeg
1/2 tsp vanilla
2 1/4 cup flour
beat eggs, butter and sugar until fluffy. add vanilla and milk. add the rest of the ingredients and stir only until incorporated.
on a well floured surface roll out the dough. keep it kind of thick as it doesn't puff up that much in the oil. take out the holes and save of course.
-- i used biscuit cutters and i used a smaller size than the doughnuts in a doughnut store. i used a proportionately smaller cutter for the hole. you can also just use a drinking glass to cut the dough. just like biscuits, you can do whatever you want to make that dough into doughnuts.
pour enough oil in a medium sauce pan to fill it up halfway. i believe that it was about half a bottle of a big bottle of vegetable oil. it doesn't have to be exact you just have to make sure the doughnuts have room to fry in there. that is, an inch of oil is not enough but if your pan is brimming with oil it's too much. you'll get it.
the oil needs to be at 370F. that's important because if it's not hot enough the dough won't fry and it will just soak up the oil and that would be gross. if you've ever tried to make tempura and didn't check the oil and all you got was a bunch of soggy mess - that's what this will be like. you can get a candy thermometer or just use a regular one. careful though, i melted mine this morning. i bought another one though, phew.
once your oil is hot enough drop in the dough (don't splash!!)
they need about 30 seconds on each side but you can see when it's done.
dry on paper towels.
you can roll them in powdered sugar or make a glaze!
i only had sugar but i liked them plain too!
i brought some extras to church and they were gone in a second!
happy sunday, enjoy your doughnuts!
love,
keighty
Saturday, January 16, 2010
lemon sage cheese.
i promised that i would have a video of me making mozzarella and it's coming. i made one but it was too long for blogger and i also have my back to the camera for have of it and you couldn't see anything anyway.
all the cheese i've made so far i've needed enzymes that i had to buy online. but this one you can make right now without waiting for packages that say they'll be there in 2 days but really take a week! (sorry, i'm just bitter. the mail system here is so bad.)
this is a crumbly dry cheese that is also spreadable somehow. it's great on toast with jam and good in spicy enchiladas. it's subtly lemony and just a nice fresh cheese.
1 gallon whole milk (can NOT be ultra pasteurized, if it is, it won't work)
1/4 cup lemon juice
1 tbs fresh chopped sage
dash of cheese salt (optional)
butter muslin - a very fine cheese cloth. this can be found at cooking stores. sorry i lied you do have to go buy one weird thing for this cheese)
heat your milk to 190 degrees, making sure to stir and keep it from burning on the bottom.
add lemon juice and stir well in an up and down motion. (that is not sloshing everything around). remove from heat, cover and leave undisturbed for 15ish minutes. check at 15 to see if a curd has formed.
**a notes on curds and whey. curds and whey is real! who knew? also if you were eating it just like that, that would be super gross and mushy and little miss muffet was gross.
anyway. when milk is heated up and enzymes (or lemon juice) are added it separates into curd and whey. whey is a opaque liquid on the bottom and curd is the cheese a solid white mass on top.
push down gently on the curd to see the whey. is is clearish? then you're done waiting! is it milky? then wait a little longer until it clears up a little more.
once the curd is set scoop it into a colander lined with butter muslin with a bowl underneath or do it in the sink! once you have all the curds in there grab the corners of the muslin and tie them up. hang the bag to drip for 2 hours. i rigged this set up over my sink to dry my cheese. you can also tie it to the faucet if it's high enough. or come up with your own fancy ideas. in any case, your cheese bag need gravity to drain so just let it hang somehow.
in 2 hours open the bag and carefully pour the cheese into a bowl. don't lose any! add salt and sage and mix well.
tada! store in a air tight container for a week.
taste the victory. you just made cheese.
if you get addicted like i did you can visit this website to learn more and buy all the things you need to get started. i just made cream cheese yesterday and it was so liberating.
enjoy, friends.
love,
keighty
make-raul-cry-enchiladas
it takes a lot to make raul admit to something being too spicy for him. he once ate those deadly black chilies at big bowl that the server warns you not to eat.
nevertheless. these enchiladas did him in and lisa too.
as you all know i dislike mexican food ---food not mexicans. exhibit a: raul alvarez, my husband.
but sometimes i make mexican food for my friends to be nice. here was my attempt.
so if you think you can hang. try this.
3/4 cup hot sauce (i had the $1.99 huge bottle from guanajuarto)
5 chopped chipotles -- from a can, unless you're fancy enough to smoke your own jalapenos
2 tbs chopped fresh sage
1/3 tomato sauce
1 tbs olive oil
2 cloves garlic, chopped
dash chili powder
dash cayenne pepper
dash sugar
salt and pepper to taste
8 flour tortillas
filling
1 wheel of queso fresco
1/2 cup of lemon sage cheese (optional -- see next post for recipe)
1/2 cup white rice
2 tbs butter
black beans
water, as much as needed
in a sauce pan saute garlic until fragrant. add all the rest of the ingredients and stir together. simmer on low heat while you get the rest of the business together.
in a saute pan melt butter and add rice. toast until the rice is yellow-ish but don't let it brown too much.
add enough water to cover the rice. simmer on low heat.
preheat your oven to 400 degrees.
check the rice. it can be al dente since it's going to be baked in the oven and can finish cooking there. drain and set aside.
pour a little bit of the sauce on the bottom of a casserole dish and spread it around so it coats the bottom.
fill each tortilla with a little rice, beans, a little sauce and both kinds of cheese. roll it up, like you do, and put it in a casserole dish. do it again and again until the dish is full.
once you're done pour the rest of the sauce over the enchiladas and make sure every piece of the tortilla is covered with sauce -- no crunchy tortillas!
grate and sprinkle the rest of the cheese on top -- covering the whole mess with a ton of sweet white deliciousness.
bake for 20ish minutes or until you stick your finger in the middle and you scream because it's so hot --do this at your own risk -- i won't be sued for your burned fingers! :) you could also just wait until the sauce starts to bubble. either way...
serve and watch your guests try to not cry.
and while everyone was dying in front of me while i ate my harmless quesadilla (to fit with the theme), they did all have seconds and in between trips for tissues they said it was great.
milk helps the burn too...
good luck!
love,
keighty
Subscribe to:
Posts (Atom)